These Feast tutorials showcase how to use Feast to simplify end to end model training / serving.
Driver rankingFraud detection on GCPReal-time credit scoring on AWSDriver stats on SnowflakeMaking a prediction using a linear regression model is a common use case in ML. This model predicts if a driver will complete a trip based on features ingested into Feast.
In this example, you'll learn how to use some of the key functionality in Feast. The tutorial runs in both local mode and on the Google Cloud Platform (GCP). For GCP, you must have access to a GCP project already, including read and write permissions to BigQuery.
This tutorial guides you on how to use Feast with . You will learn how to:
Train a model locally (on your laptop) using data from
Test the model for online inference using (for fast iteration)
Test the model for online inference using (for production use)
Try it and let us know what you think!
A common use case in machine learning, this tutorial is an end-to-end, production-ready fraud prediction system. It predicts in real-time whether a transaction made by a user is fraudulent.
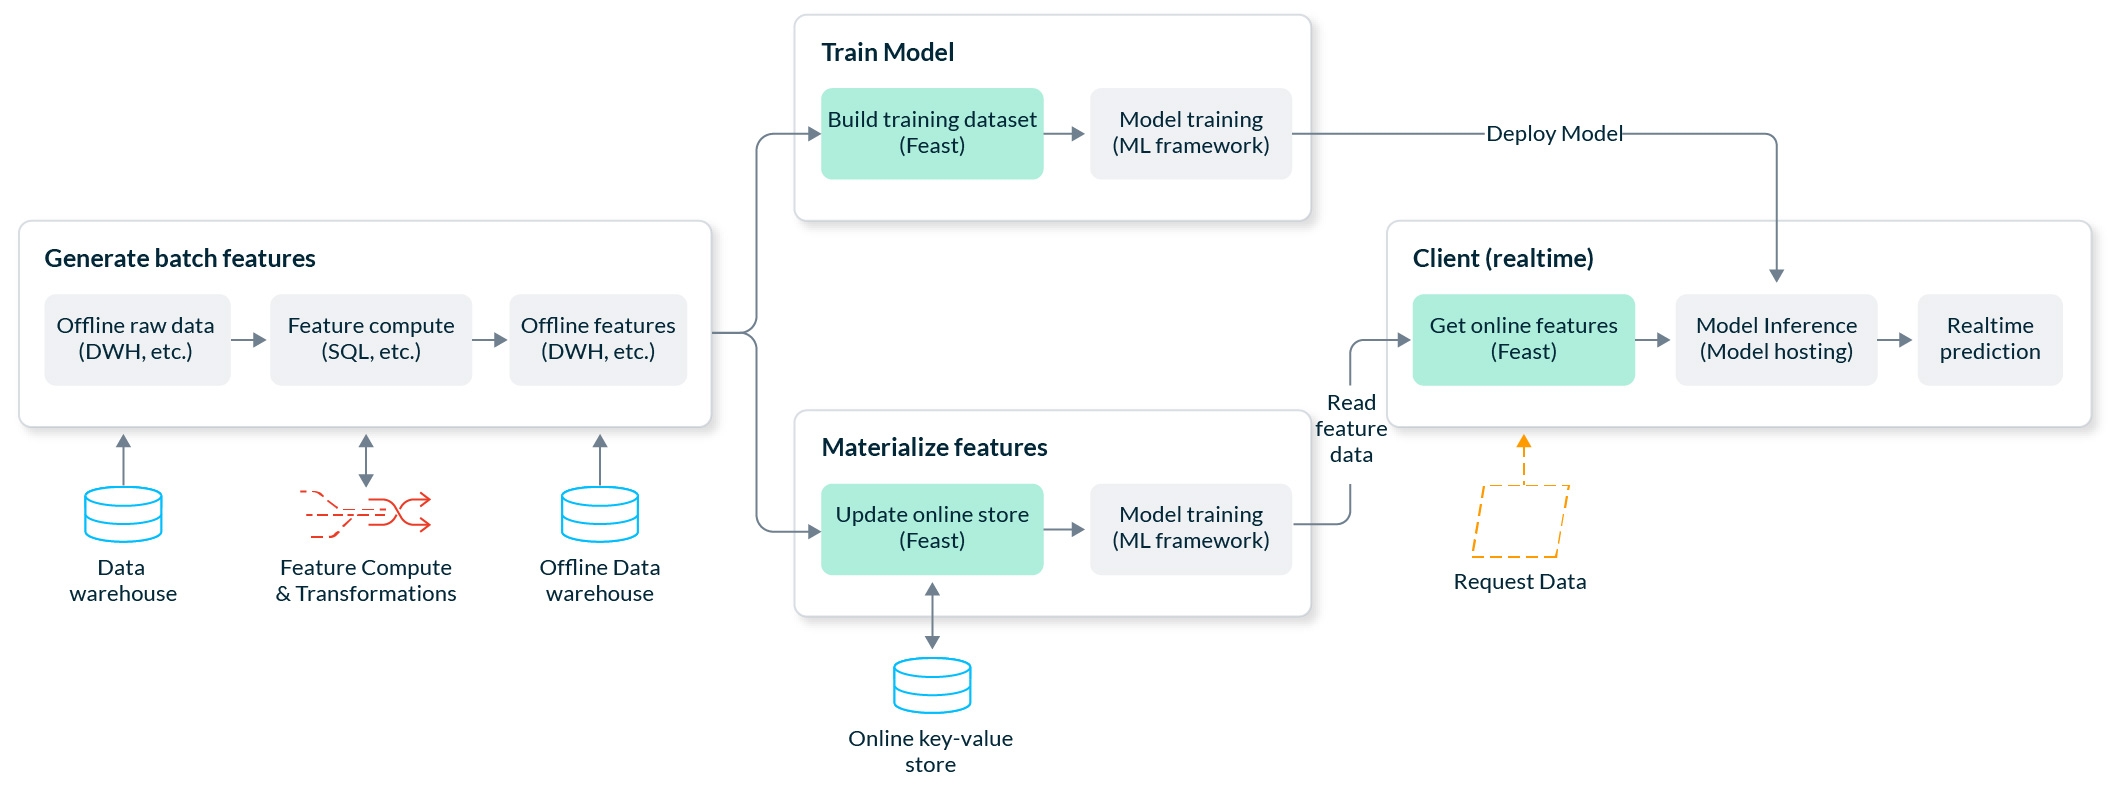
Throughout this tutorial, we’ll walk through the creation of a production-ready fraud prediction system. A prediction is made in real-time as the user makes the transaction, so we need to be able to generate a prediction at low latency.
Our end-to-end example will perform the following workflows:
Computing and backfilling feature data from raw data
Building point-in-time correct training datasets from feature data and training a model
Making online predictions from feature data
Here's a high-level picture of our system architecture on Google Cloud Platform (GCP):
Credit scoring models are used to approve or reject loan applications. In this tutorial we will build a real-time credit scoring system on AWS.
When individuals apply for loans from banks and other credit providers, the decision to approve a loan application is often made through a statistical model. This model uses information about a customer to determine the likelihood that they will repay or default on a loan, in a process called credit scoring.
In this example, we will demonstrate how a real-time credit scoring system can be built using Feast and Scikit-Learn on AWS, using feature data from S3.
This real-time system accepts a loan request from a customer and responds within 100ms with a decision on whether their loan has been approved or rejected.
This end-to-end tutorial will take you through the following steps:
Deploying S3 with Parquet as your primary data source, containing both loan features and zip code features
Deploying Redshift as the interface Feast uses to build training datasets
Registering your features with Feast and configuring DynamoDB for online serving
Building a training dataset with Feast to train your credit scoring model
Loading feature values from S3 into DynamoDB
Making online predictions with your credit scoring model using features from DynamoDB
Initial demonstration of Snowflake as an offline+online store with Feast, using the Snowflake demo template.
In the steps below, we will set up a sample Feast project that leverages Snowflake as an offline store + materialization engine + online store.
Starting with data in a Snowflake table, we will register that table to the feature store and define features associated with the columns in that table. From there, we will generate historical training data based on those feature definitions and then materialize the latest feature values into the online store. Lastly, we will retrieve the materialized feature values.
Our template will generate new data containing driver statistics. From there, we will show you code snippets that will call to the offline store for generating training datasets, and then the code for calling the online store to serve you the latest feature values to serve models in production.
pip install 'feast[snowflake]'feast init -t snowflake {feature_repo_name}
Snowflake Deployment URL (exclude .snowflakecomputing.com):
Snowflake User Name::
Snowflake Password::
Snowflake Role Name (Case Sensitive)::
Snowflake Warehouse Name (Case Sensitive)::
Snowflake Database Name (Case Sensitive)::
Should I upload example data to Snowflake (overwrite table)? [Y/n]: Y
cd {feature_repo_name}The following files will automatically be created in your project folder:
feature_store.yaml -- This is your main configuration file
driver_repo.py -- This is your main feature definition file
test.py -- This is a file to test your feature store configuration
feature_store.yamlHere you will see the information that you entered. This template will use Snowflake as the offline store, materialization engine, and the online store. The main thing to remember is by default, Snowflake objects have ALL CAPS names unless lower case was specified.
project: ...
registry: ...
provider: local
offline_store:
    type: snowflake.offline
    account: SNOWFLAKE_DEPLOYMENT_URL #drop .snowflakecomputing.com
    user: USERNAME
    password: PASSWORD
    role: ROLE_NAME #case sensitive
    warehouse: WAREHOUSE_NAME #case sensitive
    database: DATABASE_NAME #case cap sensitive
batch_engine:
    type: snowflake.engine
    account: SNOWFLAKE_DEPLOYMENT_URL #drop .snowflakecomputing.com
    user: USERNAME
    password: PASSWORD
    role: ROLE_NAME #case sensitive
    warehouse: WAREHOUSE_NAME #case sensitive
    database: DATABASE_NAME #case cap sensitive
online_store:
    type: snowflake.online
    account: SNOWFLAKE_DEPLOYMENT_URL #drop .snowflakecomputing.com
    user: USERNAME
    password: PASSWORD
    role: ROLE_NAME #case sensitive
    warehouse: WAREHOUSE_NAME #case sensitive
database: DATABASE_NAME #case cap sensitivetest.pypython test.pytest.pyfrom datetime import datetime, timedelta
import pandas as pd
from driver_repo import driver, driver_stats_fv
from feast import FeatureStore
fs = FeatureStore(repo_path=".")
fs.apply([driver, driver_stats_fv])entity_df = pd.DataFrame(
{
"event_timestamp": [
pd.Timestamp(dt, unit="ms", tz="UTC").round("ms")
for dt in pd.date_range(
start=datetime.now() - timedelta(days=3),
end=datetime.now(),
periods=3,
)
],
"driver_id": [1001, 1002, 1003],
}
)
features = ["driver_hourly_stats:conv_rate", "driver_hourly_stats:acc_rate"]
training_df = fs.get_historical_features(
features=features, entity_df=entity_df
).to_df()fs.materialize_incremental(end_date=datetime.now())online_features = fs.get_online_features(
features=features,
entity_rows=[
# {join_key: entity_value}
{"driver_id": 1001},
{"driver_id": 1002}
],
).to_dict()